Repair a broken grid line by cleaning the area around the break with the alcohol prep. Allow to dry. Peel the wax paper liner off the stencil and apply the sticky side to the glass, aligning the stencil to the existing grid line. Brush on the conductive paint. As with the tab repair, let it dry for 24 hours before using the de-mist.
To repair the grid line on your defogger, simply attach the supplied stencil to the broken grid section and paint on the electrically conductive paint. Allow it to dry, then remove the stencil. You may want to touch up your work with a single-edge razor blade. But be careful. You don’t want to damage any other grid lines.
Repairs can be completed in less than 30 minutes. However, the instructions warned us to wait 24 hours to test the defogger. One last note: You can only do this repair when the temperature is above 50 degrees F.
Advantage & Features:
1.Used to repair scratched or broken rear window defogger grid lines
2.Make Permanent, Invisible repairs
3.Fix quickly and easily with a cheap cost
4.Glue is specially formulated to conduct electricity
5.Follow the instructions easily by step
Package included:
1x 2.0ml silver repair compound
3x Cottom Swabs
1x Masking tap
1x Alcohol pre-pad
1x Plastic scraper
1x Clean cloth
Precautions :
Avoid eye contact. Do not get on skin or clothing. Avoid breathing of vapors. Use only with adequate ventilation. Do not swallow. Wash thoroughly after handling. Close container after each use.
K-Seal is specially formulated to permanently seal most cracks in the engine block and head. This unique product is guaranteed to mix with all types of glycol based coolant and antifreeze. K-Seal can also be used to seal holes and cracks in the head gasket, radiator, heater core, freeze plugs, water pump casing and other metal components of the cooling system in both petrol and diesel engines.
One of the vital parts within a car is the oxygen sensor, also known as the O2 sensor. Generally speaking, an oxygen sensor is a device that measures the proportion of oxygen in a gas or liquid. In the case of cars, the oxygen sensor is part of the emissions control system, and it helps not only to keep your car running as efficiently as possible, but also helps to reduce emissions that your car is giving off. When a car gets its carbon emissions inspection, a faulty O2 sensor will result in a failed test. However, because of its location in the vehicle, it is fairly common for things like oil and coolant to build up over these sensors, and that can cause the oxygen sensor to malfunction.
The number of O2 sensors in a car depends on the make, model, and year of the car. In most cars, there is one O2 sensor is located in front of the catalytic converter and one in each exhaust manifold. When a sensor is blocked or otherwise not working, it will trigger the “check engine” light, and it might also result in a heater circuit malfunction. When either of these things happens, it means that the car either has an excessive amount of emissions, or the O2 sensor is not working. When the O2 sensor fails, that means it cannot determine the air to fuel ratio. This causes the vehicle to use through gasoline more quickly, and ultimately results in extra air pollution and an inefficiently running vehicle. Although the typical fix for a faulty O2 sensor is to replace it with a new one, you can save some money and improve performance by cleaning the sensors.
Gather Your Supplies and Prepare for the Job
It is fairly common for oil and coolants to clog up an oxygen sensor over time. Just because an O2 sensor has unwanted contaminants, however, does not mean it is time to replace the sensor altogether. To clean out an oxygen sensor, you need to gather some supplies. These supplies are not difficult to find, but you need them on hand if you are going to be successful at cleaning your sensors.
You cannot remove the oxygen sensors without lifting the car up from the ground. It is important that you use the jack safely, as you don’t want the vehicle falling back.
You need to fill this container with gasoline/ petrol as well as the oxygen sensors, so make sure it is tough enough and large enough. This container should also have a tight lid.
Once you have gathered your supplies, take your vehicle to an open space, where there is no clutter. A garage, parking lot, or driveway can be perfect for this type of work, but you need to leave the vehicle there for several hours, so choose your work space with this in mind. Also, choose an area that has good ventilation. If you are in a garage, that means opening the garage door fully before beginning any work.
Removing the Oxygen Sensors
Now that you have prepared yourself for safety and prepared the area, it is time to get your car up on the Car Jack. Because your body is underneath the car, you want to be totally sure that the car is secure when it goes up on the Car Jack. Safety should always be your top priority when doing any type of work on a vehicle. At this point, put on yourSafety Glassesas well as your Work Gloves. You need to slide under the vehicle and find the oxygen sensors. Cars have different numbers of O2 sensors depending on the year, make, and model. Check the owner’s manual for the exact locations. At the very least, one is in front of the catalytic converter and one in each exhaust manifold.
Once you have located these sensors, spray them liberally with the WD-40 and let them set for about 10 to15 minutes. During this time, the WD-40 works to loosen the sensors as well as lubricate them. This makes the sensors easier to remove. After this time, take your wrench and remove both sets of sensors. If they are difficult to remove, spraying some more WD-40 may work to help remove them.
Soaking the Sensors
When you have removed both oxygen sensors, you need to prep the container. Remember, this container needs to be large enough to hold gasoline / petrol as well as the sensors. It also must be a container that can accommodate gasoline without breaking down.
Fill the container with gasoline / Petrol, and completely submerge the oxygen sensors into the gasoline / Petrol. Make sure you are still wearing your gloves, as you don’t want to get gasoline / Petrol on your hands. Once the sensors are in the gasoline / Petrol, put the lid on and swirl the container around. You need to do this in order to ensure that the gasoline / Petrol is getting into all of the parts of the sensors.
You now need to leave the oxygen sensors overnight in the gasoline / Petrol. Store the container in a cool area. This gives the gasoline / Petrol ample time to do the work it needs to do.
Reinstalling the Clean Oxygen Sensors
The next day, pick up the container and again, agitate it. This helps all of the sludge and gunk that has come off the sensors fall away. Open the container and take the sensors out of the gasoline / petrol. Again, make sure you are wearing gloves for this; thick rubber gloves are preferable. You should notice a big difference in the appearance of your O2 sensors.
Use paper towels to remove the excess gasoline / petrol and to dry the sensors thoroughly. Once the sensors are completely dry, they can be put back into the vehicle with the wrench. Before operating the vehicle, be sure that the sensors are in the right spot and that they are installed correctly. This is all it should take to clean the oxygen sensors and to get your vehicle running more smoothly and efficiently. If it doesn’t, you may simply need to purchase new oxygen sensors and install them.
Buying New Oxygen Sensors on eBay
If you need to buy a new oxygen sensor, even for an old car, or buy supplies to help you clean your oxygen sensor, eBay is a great choice. You find that buying oxygen sensors on eBay is extremely convenient and it can definitely help to save you money on car repairs. Before you buy anything on eBay, however, it is important that you keep a few things in mind. For example, you want to check that you are buying an oxygen sensor that is right for the make and model of your car. In most cases, you can find this in the eBay motors area of the site or by going to the eBay home page and searching from there.
Once you have narrowed down the right sensor for your make and model, take a look at the seller’s information. Specifically look at their feedback score and their positive feedback percentage. These numbers are significant. The feedback score shows you how many people have commented on their sales interaction with this seller, while the feedback percentage tells you how many people have given positive comments out of the total comments. While all eBay purchases are covered by eBay’s protection plan, buyers can be sure to have a great shopping experience every time they purchase auto parts and tools online.
If you are deciding whether to buy an upgraded vehicle to replace your existing car, or you maybe looking for your first car. Below is a video I found very informative courtesy of You Tube and Chris Fix.
When it comes to online shopping and selling, few places do it better than eBay. But, did you know that you can even buy a car there? It’s true.eBay Motorsoffers you the chance to buy new or used vehicles, motorcycles, or accessories from the familiar confines of its online marketplace.
They even have a mobile app to help you with your car buying experience. Just like the full website, when you find a vehicle you want, you can either “Make a Bid” or “Buy it Now.” The free eBay Motors App is available for both iPhone and Android smartphones. As you can see, car shopping has certainly evolved over the last few years. Next time you are in the market for car, leverage technology to make the car buying process as painless as possible.
Motors is where you will find new and used vehicles as well as parts for fixing, updating, or maintaining your existing vehicle. Motors is easy to navigate by vehicle type, category of items, sales and events, or brand and type of car, motorcycle, pickup, or van.
My Garage has everything you need to find the right parts, accessories, and deals tailored to your specific vehicle. You just provide the year, make, model, trim, and engine, and My Garage filters your search results so that you find only the most suitable parts. You can add multiple vehicles to My Garage and switch between vehicles quickly and easily. With these features it’s easy to purchase the exact parts you need.
How do you search for specific automotive parts or accessories?
There are several ways to search for specific items or accessories for your car online. Look for OEM or aftermarket items based on your car’s requirements or your personal preferences. You could also search based on your vehicle profile if you have created one.
Select a type or manufacturer of the vehicle: Choose the make, model, and trim level of your car or motorcycle by clicking the arrows on the drop-down menus.
Choose the model year: Different model years have different size, style, and fitment requirements for their components and accessories.
Specify a product, brand, or keyword: Type in the closest fit to what you need, such as anti-lock braking systems, pads, struts, wiper blades, or any vehicle parts category.
How do you search for specific vehicles?
From the Motors homepage, you can use the provided search fields to locate vehicles by make, model, year, and even type. eBay has a wide assortment of both new and used cars, vans, motorcycles, commercial vehicles and speciality vehicles like classic cars, camper vans, motorhomes, ATVs, and personal watercraft. You can then refine your search using the options on the left-hand side of your search results page.
What are the categories of parts for cars and pickups?
Engines & Engine Parts: Choose parts for the engine, such as engine mounts, timing components, belts, and gaskets. This category also includes complete engines and engine rebuilding kits.
Brakes & Brake Parts: Rotors, discs, pads, shoes, and other accessories for these essential components are located in this category of auto parts.
Mirrors:Exterior and interior mirrors and accessory mirrors for cars and trucks are available here.
Lighting & Lamps: Choose interior or exterior lights, including dome and map lights, fog lights, headlights and taillights, and brake lights. There are also covers, light bulbs, and entire light assemblies available.
Wheels, Tyres & Trims: Here, you’ll find wheels and tyres of all sizes, along with wheel hubs and bearings, hubcaps, alloy wheels, wheel spacers, and more.
Exterior: This category features body kits, lip kits, spoilers, bumpers, side skirts and other components designed to adorn the vehicle’s exterior to enhance aesthetics or performance.
This inventory isn’t limited to just cars and pickups. You can also find similar categories for other types of vehicles including motorcycles, scooters, quad bikes, boats, vans, trucks, motorhomes and more. If you’re not exactly sure what kind of vehicle, part, or accessory you’re looking for, narrow down the solutions by shopping by brand. You’ll find items from every automaker in the automotive industry, from Ford and Volkswagen to BMW and Mercedes.
Check your screen wash reservoir every week and top up if necessary. Remember worn wiper blades can scratch your windscreen which can prove a costly way of failing your MOT.
To check, ensure the engine is warm but has been off for about five minutes. The oil should be clean and the colour of dark honey. If it’s sludgy, black or has bits on it, it’s probably time for an oil change. Never let it get too low.
There are many different types of engine oil on the market. Each type of engine oil comes with a different thickness, and viscosity. These oils can also include a wide range of additives. This is because they are designed for different engines.
Viscosity defines the oil’s resistance to flow at different temperatures. Oil additives have different cleaning and anti-corrosion properties. Manufacturers now spend more time and money on developing new engine oils than ever before. There are also many more oils on the market these days. This often leads to confusion among motorists. If you put the wrong oil in your engine, it could lead to a drastic increase in wear and tear over 20,000 miles. With such a range of factors to consider, it’s important to know you’re using the right one. Car Parts 4 Less supplies engine oils for all makes and models.
Your battery will have two flat covers on the top. Pull each cover off and check to ensure there’s enough water in each cell. If not use distilled water to top up. Also check the connections — the bolts on top attached to crocodile clips. If they’re corroded, take them off and clean them with a wire brush.
5. Electrical System.
Check all external lights and the horn, If a single indicator, stop light or headlight has failed it is likely that a bulb has blown and will need to be replaced. If more than one light has failed, it is likely to be a blown fuse or fault in the circuit.
Please Note: Free delivery is not available for orders with over-sized items. Free delivery is also not available for International countries and some out of area postcodes in the UK.A surcharge and additional transit time may be applied for deliveries to these areas.
Puddles on the garage floor or drive, or obvious wetness under the bonnet / under the vehicle suggest a leak that needs investigating. It is sometimes difficult to determine where the leak is coming from, especially if engine under-shields are fitted.
Engine oil may leak from the sump drain plug or from the base of the oil filter.
The sump pan sits under the engine block. There are both wet and dry versions, but most road vehicles use the wet version. In fact, dry sumps are used almost exclusively for motor racing; they collect oil from the engine but then redistribute it via a pump, which leaves the sump dry.
By contrast, wet sump pans don’t redistribute the fluid and must be emptied when they get too full. The sump plug is a bolt at the base of the pan. To drain the pan, you need to unscrew the plug. To guard against leaks, many drivers prefer to replace the sump plug with each oil change. Because the sump pan sits at the lowest point of your car, it can suffer damage quite easily as you drive over speed bumps and flying debris.
Oil performs a number of important jobs as it flows through your engine. It keeps your engine cool, absorbs contaminants, and seals the gaps between the cylinder walls and the piston rings. Without a filter in place, the oil would pick up dirt, dust, fungus and bacteria. This would cause it to saturate and clog your engine, rather than lubricating it.
A filter allows oil to do its job properly. Yet as its own job is to collect dirt and debris, the filter can clog up and become useless. For this reason, we recommend replacing your oil filter every 5000 miles.
The Smell of fluid leaking from the vehicle may provide a clue to what’s leaking. Some fluids are distinctively coloured. It may help to remove the engine under-shield, then clean the vehicle and park it over an old sheet or cardboard for a while as an aid to locate the source of the leak.
Gearbox Oil can leak from the seals at the inboard ends of the drive shaft.
Leaking Antifreeze often leaves a crystalline deposit.
A leak occurring at a wheel is almost certainly brake fluid.
Power steering fluid may leak from the pipe connectors on the steering rack.
This blog has been written to give you an easy to follow, step by step process on how to safely jump start any vehicle.
Whatever the reason you have a flat battery, you need to know how to safely jump start your car. Car batteries have a lifespan of about 3-4 years on average. If you haven’t replaced your car battery in that length of time it could be worth considering getting a new battery for your car.
FIND A CAR WITH A GOOD BATTERY
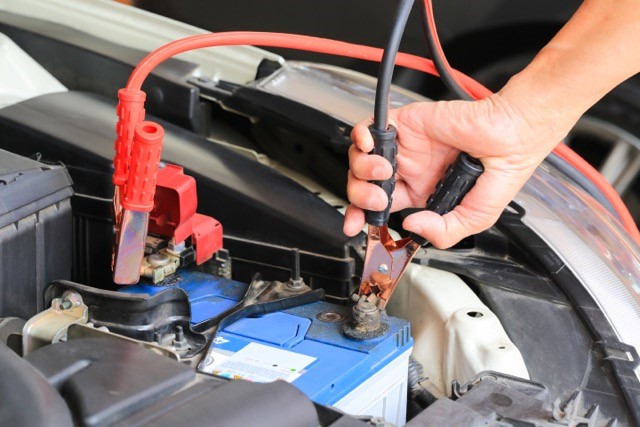
Bring a car with a working battery close to the front of your car so the cables can easily reach both batteries, but remember not to let the cars touch each other. Once you’ve done this ensure both vehicles are in park and have their handbrakes on. Now you should remove the keys from both cars and open the bonnet to locate and connect the batteries.
CONNECTING THE CAR BATTERIES
Untangle your jump cables, making sure you have one red and one black clamp in each hand. From this point onward you don’t want any of the jumper cable clamps to touch each other.
Locate the positive side of the flat battery. This should have a positive (+) sign on it and probably a red cable connecting to it. Connect the red (positive) cable to the positive terminal of the flat battery. Place the black (negative) cable on a piece of plastic NOT METAL, or if it will reach you can leave it on the floor.
Locate the positive and negative sides of the good battery. Now connect the positive (red) cable to the positive terminal, followed by the negative (black) cable to the negative terminal of the good battery.
Once you’ve connected the jump cables to the good battery it’s time to connect the final clamp. DO NOT connect the final clamp to the negative terminal of the flat battery. Ideally you want to find a bare piece of metal that isn’t a moving part and isn’t connected to any electrical components to act as a grounding point.
Connecting the final clamp to the negative terminal of the flat battery can create a spark. Flat batteries can produce hydrogen gas, which is highly flammable and the last thing you want is for the battery to explode.
JUMP START THE ENGINE
Now all the cables are connected, you can turn on the engine of the car with the good battery. Leave the engine to idle for about two minutes. This should transfer enough charge to the flat battery allowing you to start the car. If not, you can gently rev the engine on the good car to about 2000 rpm. This will help speed up charging of the flat battery.
Once you’ve been able to start the engine on the car with the flat battery you can remove the jump cables in the order they were placed. Negative (black) ground on the bad battery, negative (black) then positive (red) on the good battery and finally the positive (red) on the flat battery.
Now you’ve successfully started your car, you should drive it for at least 30 minutes. This will allow the alternator to fully charge the battery, hopefully avoiding the same situation later on.
Are you dreading having to take your car for its annual MOT check? You’re not alone. According to research from the Driver and Vehicles Standards Agency (DVSA), 40% of cars and 50% of vans fail their MOT at the first attempt. Not to worry, this article will give you our 10 top tips to pass your MOT first time.
It’s generally the fear of a hefty repair bill which worries most drivers and can cause some to delay it until the last minute, or even later. In fact a survey by the Society of Motor Manufacturers and Traders (SMMT) found that a third of motorists admitted to driving their vehicle without a valid MOT certificate. Meaning they are driving without insurance (you need a valid MOT to have insurance), risking a £1000 fine and penalty points.
The SMMT survey also found that around 1.5 million vehicles failed their annual MOT due to minor issues such as faulty bulbs, low tyre tread depth and a lack of windscreen washer fluid.
The survey highlighted the fact that many MOT failures could be avoided if the vehicles owner performed a few simple checks before they drove it to the MOT test centre.
10 Tips To Pass Your MOT First Time!
#10 Headlights & Indicators
Almost a third of cars fail an MOT test due to a faulty bulb. Yet this is one of the easiest things to check on your car. To check your headlights and indicators are working simply turn on your vehicles lights and put your hazard lights on. Your hazard lights are just your indicators flashing in unison. A short walk around your car with all the lights on will tell you if any bulbs need replacing. You will also need to check your vehicles interior lights; this is easy as they will usually come on as soon as you open any of the vehicles doors.
#9 Brake Lights
Every vehicle has rear brake lights; if yours doesn’t then they need to be changed. In order to check your vehicles brake lights you’ll need to ask someone for help, this check won’t take long and unless it’s heavy rain people are generally helpful with this one. Ask a friend to stand behind your vehicle whilst you press the brake pedal. They will be able to instantly see if you need any bulbs replacing. If any bulbs need replacing you won’t pass your MOT first time.
#8 Number Plate
This may be slightly subjective in terms of what constitutes an MOT failure. However the main areas to check are that your license plate is in good condition, the font is legible and the letter spacing complies with UK regulation.
I’ve had experience before where there were streaks within the license plate itself and was noted as an advisory on the MOT. Simply put, if you’re not sure if you will pass your MOT first time, put a new plate on.
#7 Wheels & Tyres
Tyre issues are a major contributing factor to MOT failures, yet these are one of the easiest parts to inspect yourself before your MOT. There are four things to look out for when it comes to checking your tyres:
If you aren’t sure what your tyre pressures should be there is usually a sticker on the drivers side door frame. On some older cars the tyre pressures will also be in the owners manual. It’s important to make sure you don’t over or under inflate your tyres as this can lead to uneven wear, which can reduce a tyres lifespan.
It’s also advisable to check the overall condition of your tyres before an MOT. Lumps, bulges, tears or cuts in a tyres sidewall could lead to a dangerous failure and so will count as an MOT fail.
Sidewall bulges cannot be repaired, they show that the tyre is unsafe and must be replaced. Tyres are illegal if you find a cut longer than 25mm or a cut deep enough that the cords are exposed.The last of our tyre checks is the tread depth. It’s important to note that the legal tread depth is 1.6mm. Most garages and tyre shops will recommend changing your tyres if the tread depth is less than 2mm. Luckily there are two easy ways to check the tread depth yourself.
Every tyre has a tread wear indicator built into it. These are small notches of rubber in the groove of a tyre to indicate the legal tread limit. If these are level with the outer layer of the tyre then it’s an immediate MOT failure.
The second way is the 20p test. Simply take a 20p piece and insert it into the deepest part of the tread on your tyre. If you can’t see the outer band of the 20p coin then your tyre is legal. If however you can see the outer band of the 20p coin, then your tyre is illegal, and you should change it immediately. Ensuring you have good rubber on your wheels will help you to pass your MOT first time.
#6 Seats and Seat Belts
You don’t need to worry about the outside condition of your seats, just check that your vehicles seats don’t move around whilst you’re driving.
In order to check your seat belts you should give them a good, fast tug, this simulates hard braking and will clearly show you if the seat belt mechanism is working properly. You should also check to make sure that none of the seat belts are frayed.
#5 Windscreen and Wipers
Check your windscreen carefully!
We have all experienced driving along and hearing something hit our windscreen. In order to pass your MOT first time you should check your windscreen for any damage. Chips or cracks larger than 1cm in the drivers central field of vision will cause your vehicle to fail it’s MOT.
If you do find a chip, don’t worry. There are lots of companies out there who can repair it in under 30 minutes, you’re insurance may also cover this so it’s always worth checking.
It’s also important to check your windscreen wipers. The easiest way is to pull the lever and wash your windscreen. If you can see clearly then you have no problems. If you have streaks, then you may need to inspect your wiper blades more closely as this could mean that the rubber has deteriorated. Don’t worry though, these are easily replaced.
#4 Windscreen Washer Fluid
Before you take your vehicle in for its MOT it’s important to make sure you have a sufficient amount of windscreen washer fluid. Not having enough fluid in the washer bottle is one of the biggest causes of an MOT failure.
Some garages will charge you to top this up, so it’s definitely worth checking before you go for an MOT.
#3 Fuel and Engine Oil
Oil is a vital component of all engines, not having enough can cause serious damage to your vehicles’ engine. To check your engine oil
level park your vehicle on a flat, level surface and remove the oil dipstick. Wipe the dipstick clean, replace it and remove again to check the indicator markings. If you don’t have enough it’s always best to top it up as this will help you to pass your MOT first time.
You should also ensure that your vehicle has enough petrol in the tank as an emissions test is part of your vehicles MOT test. After all you don’t want to fail an MOT simply because your vehicle ran out of fuel. The MOT test centre is under no obligation to put fuel in your tank to complete an MOT!
#2 Horn
This one is obvious, and you will be able to instantly tell if your horn is working properly. To test your vehicles horn, firmly press the horns button. This is usually found on, or around, your steering wheel.
#1 Check Previous MOT Certificates
It’s advisable to read your previous MOT certificates before getting your vehicle MOT tested. There may be advisories or recommendations from last year which you haven’t addressed yet.
If it was an advisory last year, there’s a chance it could be an MOT failure this year. If you don’t understand what an advisory means you can always call up the garage that performed your vehicles MOT test last year and ask the mechanic.
Performing all of the above checks and replacing any necessary parts will help to ensure you pass your MOT first time.


 10 Tips To Pass Your MOT First Time!
 This may be slightly subjective in terms of what constitutes an MOT failure. However the main areas to check are that your license plate is in good condition, the font is legible and the letter spacing complies with
  Tyre issues are a major contributing factor to MOT failures, yet these are one of the easiest parts to inspect yourself before your MOT. There are four things to look out for when it comes to checking your tyres:
 If you aren’t sure what your tyre pressures should be there is usually a sticker on the drivers side door frame. On some older cars the tyre pressures will also be in the owners manual. It’s important to make sure you don’t over or under inflate your tyres as this can lead to uneven wear, which can reduce a tyres lifespan.
 The last of our tyre checks is the tread depth. It’s important to note that the legal tread depth is 1.6mm. Most garages and tyre shops will recommend changing your tyres if the tread depth is less than 2mm. Luckily there are two easy ways to check the tread depth yourself.
 Every tyre has a tread wear indicator built into it. These are small notches of rubber in the groove of a tyre to indicate the legal tread limit. If these are level with the outer layer of the tyre then it’s an immediate MOT failure.
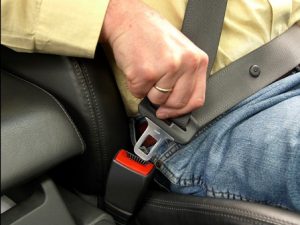 You don’t need to worry about the outside condition of your seats, just check that your vehicles seats don’t move around whilst you’re driving.
 Check your windscreen carefully!
 If you do find a chip, don’t worry. There are lots of companies out there who can repair it in under 30 minutes, you’re insurance may also cover this so it’s always worth checking.
 Before you take your vehicle in for its MOT it’s important to make sure you have a sufficient amount of
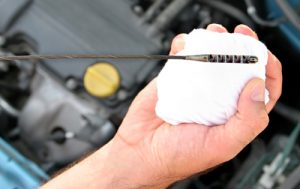
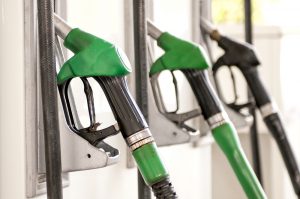 You should also ensure that your vehicle has enough petrol in the tank as an emissions test is part of your vehicles MOT test. After all you don’t want to fail an MOT simply because your vehicle ran out of fuel. The MOT test centre is under no obligation to put fuel in your tank to complete an MOT!
 This one is obvious, and you will be able to instantly tell if your
