Buying a new car can be confusing, stressful and generally just a massive hassle! But it shouldn’t feel like pulling teeth. Here at FairSquare, we’re committed to making cars and finance as simple and pain-free as possible. Here’s how it works:
Search for your perfect car. Whether you’ve got a particular make or model in mind, we’ve got thousands of new and used cars to discover – with great discounts already applied.
Get a range of example finance offers from approved lenders, reflective of your credit profile. We’re completely independent, so will always look to get you the very best deal. Plus, best of all, our ‘soft search’ won’t affect your credit score.
Ready to go ahead? Generate confirmed offers and choose the option which best suits your financial needs.
Share your ID (so we know it’s you), and make a small deposit to secure your deal.
Your car is on the way. We’ll call you to sort out a delivery date to your home address.
With cars and finance all in one place, no haggling with dealers or visiting loads of showrooms, and finance offers to suit every budget, why find a car any other way?
Start browsing for your vehicle now!
FairSquare was set up to change the car buying experience. To truly put customers in the driving seat and give them confidence in every aspect of the journey.
On one site and online journey customers can search through 1000s of discounted brand new and used cars all from the very best and largest dealer groups in the UK. All cars come either with a Manufacturer Warranty or Dealer Group Warranty.
The customer can then Create an Account and see Likely / Example offers from a panel of lenders on their chosen car / cars. FairSquare run a soft credit search which gives customers a full and impartial view of the different lenders, loan types and rates they are likely to get based on their credit history for their car / cars of choice. FairSquare have the key lender criteria and thus can do this without passing any data to the lenders at this stage.
Once the customer is happy with the chosen car they are able to generate Confirmed Offers from the lenders. The lenders are passed the customer data and then come back in real time and FairSquare display their best bids to the customer. The customer can then choose which lender to proceed with.
After the customer has gone through the conversion process which includes a Selfie / Driving License photo etc then FairSquare deliver the car to the customer at the customers convenience! Typically the car can be delivered with 3-5 working days.
If the customer is not happy with the car for whatever reason then they have 14 days to simply unwind the agreement from when they received the car. The customer will be put back into the very same position they were in before they decided to proceed with the purchase. FairSquare will pick up the car.
With FairSquare, customers get discounted new and quality used cars with the best possible rate finance delivered to them and they don’t have to leave their sofa! FairSquare have a zero preferred lender policy and charge the lenders a lower than market broker fee. Thus unlike other brokers and dealers we ensure the rates offered to customers are always the best available to them.
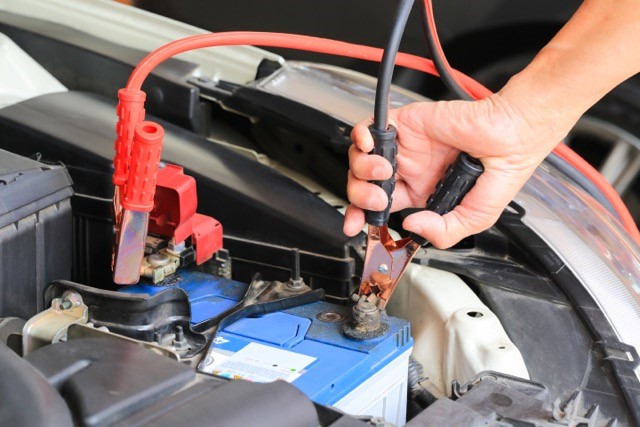
This blog has been written to give you an easy to follow, step by step process on how to safely jump start any vehicle.
Whatever the reason you have a flat battery, you need to know how to safely jump start your car. Car batteries have a lifespan of about 3-4 years on average. If you haven’t replaced your car battery in that length of time it could be worth considering getting a new battery for your car.
FIND A CAR WITH A GOOD BATTERY
Bring a car with a working battery close to the front of your car so the cables can easily reach both batteries, but remember not to let the cars touch each other. Once you’ve done this ensure both vehicles are in park and have their handbrakes on. Now you should remove the keys from both cars and open the bonnet to locate and connect the batteries.
CONNECTING THE CAR BATTERIES
Untangle your jump cables, making sure you have one red and one black clamp in each hand. From this point onward you don’t want any of the jumper cable clamps to touch each other.
Locate the positive side of the flat battery. This should have a positive (+) sign on it and probably a red cable connecting to it. Connect the red (positive) cable to the positive terminal of the flat battery. Place the black (negative) cable on a piece of plastic NOT METAL, or if it will reach you can leave it on the floor.
Locate the positive and negative sides of the good battery. Now connect the positive (red) cable to the positive terminal, followed by the negative (black) cable to the negative terminal of the good battery.
Once you’ve connected the jump cables to the good battery it’s time to connect the final clamp. DO NOT connect the final clamp to the negative terminal of the flat battery. Ideally you want to find a bare piece of metal that isn’t a moving part and isn’t connected to any electrical components to act as a grounding point.
Connecting the final clamp to the negative terminal of the flat battery can create a spark. Flat batteries can produce hydrogen gas, which is highly flammable and the last thing you want is for the battery to explode.
JUMP START THE ENGINE
Now all the cables are connected, you can turn on the engine of the car with the good battery. Leave the engine to idle for about two minutes. This should transfer enough charge to the flat battery allowing you to start the car. If not, you can gently rev the engine on the good car to about 2000 rpm. This will help speed up charging of the flat battery.
Once you’ve been able to start the engine on the car with the flat battery you can remove the jump cables in the order they were placed. Negative (black) ground on the bad battery, negative (black) then positive (red) on the good battery and finally the positive (red) on the flat battery.
Now you’ve successfully started your car, you should drive it for at least 30 minutes. This will allow the alternator to fully charge the battery, hopefully avoiding the same situation later on.
Are you dreading having to take your car for its annual MOT check? You’re not alone. According to research from the Driver and Vehicles Standards Agency (DVSA), 40% of cars and 50% of vans fail their MOT at the first attempt. Not to worry, this article will give you our 10 top tips to pass your MOT first time.
It’s generally the fear of a hefty repair bill which worries most drivers and can cause some to delay it until the last minute, or even later. In fact a survey by the Society of Motor Manufacturers and Traders (SMMT) found that a third of motorists admitted to driving their vehicle without a valid MOT certificate. Meaning they are driving without insurance (you need a valid MOT to have insurance), risking a £1000 fine and penalty points.
The SMMT survey also found that around 1.5 million vehicles failed their annual MOT due to minor issues such as faulty bulbs, low tyre tread depth and a lack of windscreen washer fluid.
The survey highlighted the fact that many MOT failures could be avoided if the vehicles owner performed a few simple checks before they drove it to the MOT test centre.
10 Tips To Pass Your MOT First Time!
#10 Headlights & Indicators
Almost a third of cars fail an MOT test due to a faulty bulb. Yet this is one of the easiest things to check on your car. To check your headlights and indicators are working simply turn on your vehicles lights and put your hazard lights on. Your hazard lights are just your indicators flashing in unison. A short walk around your car with all the lights on will tell you if any bulbs need replacing. You will also need to check your vehicles interior lights; this is easy as they will usually come on as soon as you open any of the vehicles doors.
#9 Brake Lights
Every vehicle has rear brake lights; if yours doesn’t then they need to be changed. In order to check your vehicles brake lights you’ll need to ask someone for help, this check won’t take long and unless it’s heavy rain people are generally helpful with this one. Ask a friend to stand behind your vehicle whilst you press the brake pedal. They will be able to instantly see if you need any bulbs replacing. If any bulbs need replacing you won’t pass your MOT first time.
#8 Number Plate
This may be slightly subjective in terms of what constitutes an MOT failure. However the main areas to check are that your license plate is in good condition, the font is legible and the letter spacing complies with UK regulation.
I’ve had experience before where there were streaks within the license plate itself and was noted as an advisory on the MOT. Simply put, if you’re not sure if you will pass your MOT first time, put a new plate on.
#7 Wheels & Tyres
Tyre issues are a major contributing factor to MOT failures, yet these are one of the easiest parts to inspect yourself before your MOT. There are four things to look out for when it comes to checking your tyres:
If you aren’t sure what your tyre pressures should be there is usually a sticker on the drivers side door frame. On some older cars the tyre pressures will also be in the owners manual. It’s important to make sure you don’t over or under inflate your tyres as this can lead to uneven wear, which can reduce a tyres lifespan.
It’s also advisable to check the overall condition of your tyres before an MOT. Lumps, bulges, tears or cuts in a tyres sidewall could lead to a dangerous failure and so will count as an MOT fail.
Sidewall bulges cannot be repaired, they show that the tyre is unsafe and must be replaced. Tyres are illegal if you find a cut longer than 25mm or a cut deep enough that the cords are exposed.The last of our tyre checks is the tread depth. It’s important to note that the legal tread depth is 1.6mm. Most garages and tyre shops will recommend changing your tyres if the tread depth is less than 2mm. Luckily there are two easy ways to check the tread depth yourself.
Every tyre has a tread wear indicator built into it. These are small notches of rubber in the groove of a tyre to indicate the legal tread limit. If these are level with the outer layer of the tyre then it’s an immediate MOT failure.
The second way is the 20p test. Simply take a 20p piece and insert it into the deepest part of the tread on your tyre. If you can’t see the outer band of the 20p coin then your tyre is legal. If however you can see the outer band of the 20p coin, then your tyre is illegal, and you should change it immediately. Ensuring you have good rubber on your wheels will help you to pass your MOT first time.
#6 Seats and Seat Belts
You don’t need to worry about the outside condition of your seats, just check that your vehicles seats don’t move around whilst you’re driving.
In order to check your seat belts you should give them a good, fast tug, this simulates hard braking and will clearly show you if the seat belt mechanism is working properly. You should also check to make sure that none of the seat belts are frayed.
#5 Windscreen and Wipers
Check your windscreen carefully!
We have all experienced driving along and hearing something hit our windscreen. In order to pass your MOT first time you should check your windscreen for any damage. Chips or cracks larger than 1cm in the drivers central field of vision will cause your vehicle to fail it’s MOT.
If you do find a chip, don’t worry. There are lots of companies out there who can repair it in under 30 minutes, you’re insurance may also cover this so it’s always worth checking.
It’s also important to check your windscreen wipers. The easiest way is to pull the lever and wash your windscreen. If you can see clearly then you have no problems. If you have streaks, then you may need to inspect your wiper blades more closely as this could mean that the rubber has deteriorated. Don’t worry though, these are easily replaced.
#4 Windscreen Washer Fluid
Before you take your vehicle in for its MOT it’s important to make sure you have a sufficient amount of windscreen washer fluid. Not having enough fluid in the washer bottle is one of the biggest causes of an MOT failure.
Some garages will charge you to top this up, so it’s definitely worth checking before you go for an MOT.
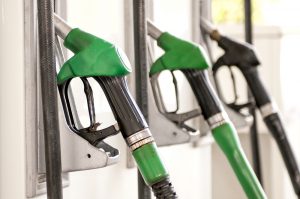
#3 Fuel and Engine Oil
Oil is a vital component of all engines, not having enough can cause serious damage to your vehicles’ engine. To check your engine oil
level park your vehicle on a flat, level surface and remove the oil dipstick. Wipe the dipstick clean, replace it and remove again to check the indicator markings. If you don’t have enough it’s always best to top it up as this will help you to pass your MOT first time.
You should also ensure that your vehicle has enough petrol in the tank as an emissions test is part of your vehicles MOT test. After all you don’t want to fail an MOT simply because your vehicle ran out of fuel. The MOT test centre is under no obligation to put fuel in your tank to complete an MOT!
#2 Horn
This one is obvious, and you will be able to instantly tell if your horn is working properly. To test your vehicles horn, firmly press the horns button. This is usually found on, or around, your steering wheel.
#1 Check Previous MOT Certificates
It’s advisable to read your previous MOT certificates before getting your vehicle MOT tested. There may be advisories or recommendations from last year which you haven’t addressed yet.
If it was an advisory last year, there’s a chance it could be an MOT failure this year. If you don’t understand what an advisory means you can always call up the garage that performed your vehicles MOT test last year and ask the mechanic.
Performing all of the above checks and replacing any necessary parts will help to ensure you pass your MOT first time.


 10 Tips To Pass Your MOT First Time!
 This may be slightly subjective in terms of what constitutes an MOT failure. However the main areas to check are that your license plate is in good condition, the font is legible and the letter spacing complies with
  Tyre issues are a major contributing factor to MOT failures, yet these are one of the easiest parts to inspect yourself before your MOT. There are four things to look out for when it comes to checking your tyres:
 If you aren’t sure what your tyre pressures should be there is usually a sticker on the drivers side door frame. On some older cars the tyre pressures will also be in the owners manual. It’s important to make sure you don’t over or under inflate your tyres as this can lead to uneven wear, which can reduce a tyres lifespan.
 The last of our tyre checks is the tread depth. It’s important to note that the legal tread depth is 1.6mm. Most garages and tyre shops will recommend changing your tyres if the tread depth is less than 2mm. Luckily there are two easy ways to check the tread depth yourself.
 Every tyre has a tread wear indicator built into it. These are small notches of rubber in the groove of a tyre to indicate the legal tread limit. If these are level with the outer layer of the tyre then it’s an immediate MOT failure.
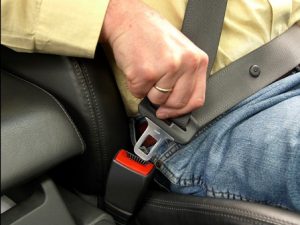 You don’t need to worry about the outside condition of your seats, just check that your vehicles seats don’t move around whilst you’re driving.
 Check your windscreen carefully!
 If you do find a chip, don’t worry. There are lots of companies out there who can repair it in under 30 minutes, you’re insurance may also cover this so it’s always worth checking.
 Before you take your vehicle in for its MOT it’s important to make sure you have a sufficient amount of
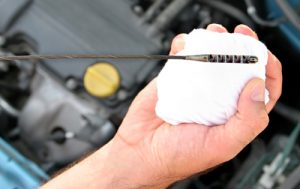
 You should also ensure that your vehicle has enough petrol in the tank as an emissions test is part of your vehicles MOT test. After all you don’t want to fail an MOT simply because your vehicle ran out of fuel. The MOT test centre is under no obligation to put fuel in your tank to complete an MOT!
 This one is obvious, and you will be able to instantly tell if your
